!!Con is a tiny two-day conference about “the joy, excitement, and surprise of programming.” I presented at this year’s !!Con on the topic of knitting machines, and the video of my talk is now available on youTube! I’ve posted a transcript and some images from the slides below the cut.
Note: this transcript was edited from the real-time captions that were produced by Stan Sakai. Really: most of this text was entered at the speed of my speech, using a special keyboard and a lot of skill. Check out Stan’s website to learn more about real-time captioning.
Transcript
Okay. Hi. I’m Lea. I do a lot of stuff with code and textiles. So sometimes I make stuff with computation mixed into the final product. So that’s a cocktail dress which has some microcontrollers physically inside. But right now I work with a research lab where I work with code on the input side of textiles. so I work with industrial machines that make the fabric itself and the machines are controlled by code that I write. One of the awesome machines that I work with is a knitting machine.
Knitting, for those of you who haven’t met it, it’s one of the ways we have of turning a yarn into a full surface through careful intermeshing. In knitting in particular, the surface is made out of a grid of loops.
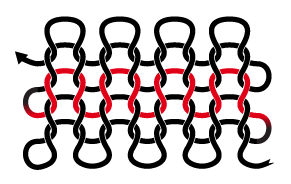 The path of the yarn zig zags from the bottom to the top. The loops next to each other are connected by being knit continuously with a length of string and the loops stacked vertically each hold a loop from the previous line. Each loop is held in place by another loop in the line above it. That’s important. A loop that has not yet had another loop passed through it can be thought of as live or temporarily unstable. So this swatch is just held with friction and you could unravel it by pulling the thread as you walk away.
In handknitting, the live stitches are all held next to each other on one long needle and then the new loops are pulled through by another needle which then acts as the holding place for the new unstable row. In machine knitting each loop is allocated to its own hook-shaped needle which is capable of pulling through a single new loop through the one that’s parked on it. Here’s an animation of a new loop being formed, and let’s take a moment to watch that for a couple of seconds. I also have this sweet hand-crank version if you want to come play with it after the talk. I recommend it. You turn the crank and it knits. So this, what you’re seeing here, the knit stitch is arguably the most important atomic operation that the machine can do.
Relatedly, a second atomic operation is the tuck stitch, which adds a loop to the needle without pulling it through and therefore dropping the previous one. You can use these for textural effects, you can use them for adding elastic, or doing color work if you’re using two different yarn colors for example. Just to throw it out there topologically, the first row you knit is necessarily a tuck row because there’s no previous loop there.
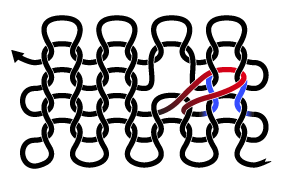
A third atomic operation is the transfer. There are actually hundreds of these hook-shaped needles; they’re all very tiny and they’re arranged in two rows called beds — so we’re seeing both beds in the picture — and they meet at a ninety degree angle. And any of those can hold a stitch, and also any of those needles can transfer a stitch from one of the beds to the needle that’s directly opposite on the other bed. So we can transfer from the front bed to its corresponding needle on the the back bed or vice versa. Relatedly, we can also change the alignment of the two beds. This is called racking the back bed and it moves the entire back bed sideways.
Okay, so that’s four big things we can do. And how are they useful? Four things. Let’s look at some swatches. Rectangles are really easy. We can just knit some stitches with a row, make another row, make another row, and we keep going. And note that in this slide we’re reading from the bottom to the top because that’s how the stitches are formed. Gravity makes it so.
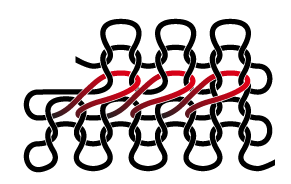
Okay. How about lace, though. That’s kind of complicated looking, right? A lace is any fabric with a pattern made of holes. So there are actually lace making methods for all of the textile processes. In knitting when we want to make a hole we can’t just drop a stitch, right, because every stitch has to be held by at least one other stitch or else it and all of its predecessors will drop. You can move a stitch out of the way by transferring it onto its neighbor.
 The way we do that is we transfer to the other bed, we move the other bed one way or the other and then we transfer back up to its original bed. Then note that the stitch above that hole is a tucked stitch because it doesn’t have anything to pull through.
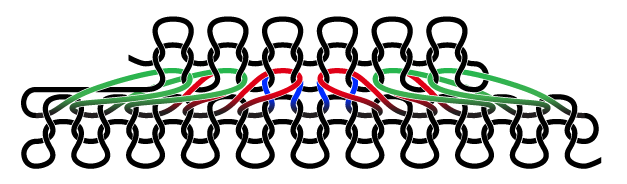
Okay what if we move a whole chunk of stitches over? Like, maybe all the way to the edge? We have a fabric that is now slightly narrower. Or conversely we could move some fabric outwards and we would have a fabric that’s slightly wider.
 Okay, this my like Julia [Evans]: this sounds kind of boring but I tell you it’s really amazing! Because fabric that is slightly narrower or wider is how we make complicatedly three-dimensionally shaped fabrics for our complicated three-dimensionally shaped bodies. So we’ve got the ability to make these arbitrarily shaped surfaces out of these four atomic operations and these are machines that exist right now in industry.
And I think we can probably assume there’s some really cool UI that fancy designers in loft spaces are using to tell what these machines what to do? No. Right. Here’s the proprietary programming language that is used by the company that made the machine that I use. It’s a 2D array of color values — AKA, pixel art. You read it from the bottom to the top, and each horizontal line of the pattern corresponds to a pass of the carriage. The carriage is what actually articulates the needles. Because they’re so tiny there’s not like a solenoid hooked up to each one, they follow a cam path in this physical hunk of metal that hurtles from side to side and articulates them. This is just one part of the pattern because they get tall very quickly. So let’s zoom in.
Okay, stuff in the middle is essentially stitch-by-stitch instructions. Most of stitch combinations are shorthands for the combinations of the operations that we went over before. So fifty one and fifty two which are, obviously, pale pink and pale green, correspond to the front and back bed knit stitches, so you see those stripy areas are knitting a tube, again obviously, and then those sort of purply colors lower down are transfers forward and back. The streaky lines up the side are called option lines and they carry machine instructions for that entire carriage pass and so the rack value that’s moving the bed side to side is set by one of those lines, which is a lie, actually it’s set by two of the lines, it’s set by the mauve and purple line and the red and yellow stripy bits going on, and they interact in kind of an inexplicable way. And which yarn we’re using is set by another one, and you can do repeat blocks as well. So yeah, this is pretty easy to read but it gets complicated really quickly when we’re talking about something more like a glove, for example.
I’ve spent about six months learning to read these. This is a real system that we really actually use in industry. I’m pretty sure that we can do better. A large part of doing better is going to involve doing visual simulations of the object because that’s kind of one of the better ways to do UI in my opinion but we also need to think about what kind of abstractions we’re going to build on top of.
So one thing that we can right off the bat, we can do some loops! That’s a joke, because knitting’s all about loops. So this is straightforward. This is a nested loop and we’re making a rectangle and this is overly simplified because it turns out we care about directionality: we care whether the yarn is coming in leftwards or rightwards, and we calso care about whether the loop is being pulled from the back to the front, or front to back. And back to front and front to back is determined by which bed we’re using. So we really want something more like this. Because we’re alternating rows going left and right, we need to take them two at a time. So this is actually what it looks like to knit a rectangle. Sort of; this is still simpliflied.
So how about that business with moving the stitches around with all the transfers and racks. So this is basically just a pseudo-code version of what I showed you earlier. We’re transferring back, we’re racking the bed over, and then transferring forward again — and it turns out it’s a good idea to set your rack back to zero so that you’re set up for the next time around. This is great. This is all we need if we’re transferring just one stitch around.
Something that we haven’t talked about yet is knit time efficiency. Yeah. Something — one of the nice things about this format is that they make visible something that’s actually really important especially in industry. I said earlier that each horizontal line corresponds to a physical pass of the carriage. It’s a thing that takes time to do. So there’s actually a direct correlation between the height of this drawing and how long it’s going to take to knit something. And one of the things that will get you really quickly is the transfers because the transfers have to happen in a row all by themselves and remember we can only set the rack value per line. So this thing that I just coded up takes a minimum of two passes which is great if you only want to do one transfer, right, or one sideways movement but if we’re talking about a lace where we’ve got three hundred stitches in a row that all want to go over by one, and we just naively call this thing three hundred times, we’re talking about six hundred passes for a single this-tall row of knitting and that’s a bad idea. Probably. Probably a bad idea. So we want to do something more like this instead. Let’s transfer all our stitches back at the same time and rack it, and transfer them all forward at the same time again.
Yeah, this looks really good. But what if the stitches are going to go to different locations? They’re not all going plus one. Maybe one of them’s going minus one, and one of them is going plus one. Or maybe they’re swapping places like if it’s a cable knit or what if I want to narrow a fabric evenly across its width.
 The ones on the edge are being moved in by quite a lot but the ones in the middle are either staying in place or moving by just a little bit. Here’s a fun one. The machine has a maximum amount that it can rack over. It’s a physical piece of metal that has to stay inside a bigger physical piece of metal. So what if we wanted to rack over more than the bed can actually move, and what if we wanted to do all of these things at the same time? Ehh — ah, mmm. I’ve actually written all of these cases specifically but I haven’t actually written a function that combines them all together because I actually have no idea. This is one of those talks where I’m like, “I have no idea but we’re accepting interns.” So in the meantime, though, I’m having a really good time turning this nonsense, which kind of looks familiar to you into something that looks more like this. Look at this awesome thing that is — these look the same, right? Yeah! All right. I’m out of time. Come talk to me. We can talk about modular arithmetic and short rows.